A Beginners Guide to Kubernetes: Workload Resources

Introduction
In Kubernetes, the main type of workload resource is a Pod and all applications that are deployed on Kubernetes will be made up of one, or many Pods that work together. As I covered in my previous Kubernetes Beginners Guide a Pod is also the smallest unit of deployment in Kubernetes and can be deployed by itself as just a Pod, but in doing so you would be missing out on many of the great benefits of using Kubernetes which are probably some of the reasons you want to use it in the first place!
So what are these benefits I am referring to? Well here are just a few of the most important:
- Scaling: The ability to increase (or decrease) the number of instances of your Pod. This is commonly referred to as replication in Kubernetes and each instance of your Pod is a replica
- Automatic Healing: If your Pod becomes unhealthy for some reason, another instance of the Pod is automatically started up to replace it.
- Rollout: Probably more commonly referred to as “Rolling Updates” is when one Pod instance at a time is replaced with a new version during an upgrade instead of one big bang. This helps achieve high availability of services and keeps downtime to a minimum.
If the above benefits sound good to you then keep reading on, as I will explain some of the alternative ways to deploy your applications in your Kubernetes deployment.
Controllers
Although you can deploy a Pod by itself this is not usually common practice and instead, a Pod would be indirectly deployed as part of a different workload resource that has a Controller.
A Controller is a process that runs within the control plane as part of the kube-controller-manager, it is responsible for tracking and updating the state of any resources linked to it such as Pods (it is not limited to just Pods). It does this by using using the Kubernetes API server to identify the current state and then make the required changes to achieve the desired state.
So in plain English, if you specify that you would like two replicas of your Pod, the controller will check how many replicas of that Pod there currently are and either add another replica of the Pod if there is only one or likewise it will remove a replica if there is currently three.
So what other workload resources are there then?
ReplicaSet
A ReplicaSet is a resource that will automatically create and manage the number of replicas of a specific Pod. The Pod that it manages is specified using a label selector.
Note: A Pod can be defined with labels that give more meta information such as the application name or type e.g frontend or backend. The labels are defined as key-value pairs in the Pod specification or can be added retrospectively.
Since ReplicaSets select their Pods using labels they will also take control of other Pods in the cluster that have labels matching their selectors and if they currently have no other controller, even if they didn’t create it! Depending on your use case, this can be either good or bad. For example, if we created a ReplicaSet that selected Pods with the label “type: frontend” when we deploy that ReplicaSet into a cluster with two existing Pods that contain that label it would assume control of them.

ReplicaSet assumes control of two existing Pods and creates one of its own.
In the above diagram, I have outlined the previous example of a ReplicaSet selecting Pods with the label “type: frontend”. In the diagram, the ReplicaSet has been instructed to create three replicas and since it has taken control of two existing Pods it only needs to create one additional new Pod using the Pod template outlined as part of the ReplicaSets specification. This results in three different types of Pods/Applications being controlled by the ReplicaSet.
Deployment
A Deployment is the preferred way to create a ReplicaSet. It declares a Deployment controller which in turn creates and controls ReplicaSet, which then creates the Pods. A Deployment specification also has a Pod template declared as part of it just like a ReplicaSet to outline the Pod it should create replicas of. When creating a ReplicaSet via a Deployment there is some validation carried out on the Deployment specification to check that you have a valid Pod label and matching label selector on the ReplicaSet. It does not prevent you from declaring multiple Deployments with overlapping labels and selectors.
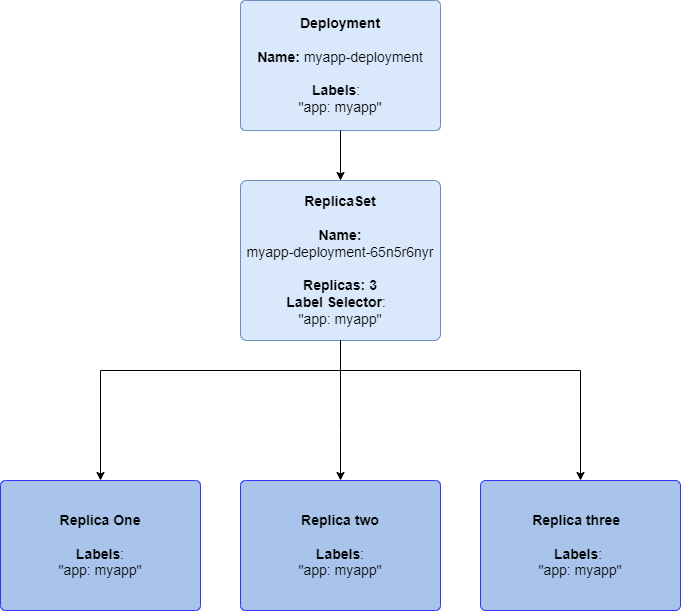
A Deployment with a ReplicaSet and three Pod replicas
At this point, you might be asking isn't a Deployment just the same as a ReplicaSet? Why do we need a ReplicaSet at all? Well, a Deployment is essentially a wrapper for the ReplicaSet that provides some useful functionality such as Rolling Updates of the ReplicaSet itself.
When updating a ReplicaSet you would normally have to scale down your ReplicaSet and then deploy your new version, the Deployment controller handles this for us and automates the update process for us.
Just like the ReplicaSet when an update is made to the Pod specified in the Deployment, all existing instances of the original Pod will be replaced in a rolling fashion.
StatefulSet
A StatefulSet is similar to a Deployment. It creates a given number of replicas of the Pod outlined in its specification and can be scaled up and down on the fly to meet demand. How a StatefulSet differs from a Deployment is suggested by its name, it is used to create Pods that are required to be stateful by nature. It does this by allowing you to specify a PersistentVolume as part of its specification, this PersistentVolume is essentially a piece of storage that can be mounted to your Pod to use as a persistent storage volume/file system. If your Pod is removed for some reason or becomes unhealthy and is replaced the storage is not affected and will be re-mounted to the new replica of the Pod allowing the application to read any files that were stored by the previous replica and hopefully continue where it left off. For this reason, StatefulSets are commonly used for database applications.
Another unique feature of a StatefulSet is that it will deploy its replicas using an ordered numbering system. Where a Deployment will create a Pod with a name like “my-app-h6r547ehr” with a hash value appended to the end, a StatefulSet will create its instances using the following naming scheme “my-app-0, my-app-1… my-app-n”. The StatefulSet will also ensure that its replicas are deployed in the correct order, zero being first. If replica number three is currently due to be deployed but zero becomes unhealthy, the StatefulSet will schedule a new Pod to replace zero instead of deploying replica number three. It also applies this ordered strategy while rolling out updates.

A StatefulSet with three replicas each with unique ordered names
Each replica in a StatefulSet will also have a unique network identifier in the way of a hostname that is made up of the StatefulSets name and its relative replica number, this is similar to the naming scheme of the replicas e.g for replica zero of a StatefulSet called “my-app” our Pods hostname would be “my-app-0”.
Note: When running a StatefulSet with only one replica you may face some downtime during an upgrade, this is because of the way StatefulSets will ensure that only one Pod with the same name exists at any one time. Since a StatefulSet Pod named “my-app-0” will be replaced with another Pod with the same name the StatefulSet controller will wait until the first one is fully terminated before creating a new one. To avoid this try scaling up your StatefulSets before upgrading.
DaemonSet
A DaemonSet in its default configuration will ensure that you have a replica of your Pod running on each of the worker nodes in your cluster. This can be useful for certain types of applications such as log collectors which need to have access to each node where your other services are running and storing their logs.
DaemonSets can also be configured to use a label selector to select which nodes to run on instead of just running on all nodes in the cluster. This may be helpful when you only want to run a replica of your Pod on a subset of your nodes. Taking us back to our log collector example, if we only wanted to collect logs for a log-producing application that only runs on specific nodes we could specify a label selector to choose only the specific nodes our application is running on instead of all nodes. This could help us save some resources by not creating replicas of our Pod on nodes that they are not needed on.

A DaemonSet creates a replica on each worker node by default
The DaemonSet can be looked down upon by a lot of people for its subjectively resource-intensive approach to Pod replication but used correctly and for the appropriate use case, it can prove very useful.
Job
A Job is used to run a Pod that will carry out a task until completion. It can also run multiple Pods in parallel. If the Pod fails to complete the Job controller will automatically create a new Pod that will attempt to complete the task again. The task can be anything that will run to completion and return zero on success or one on failure (so most commands/applications), some common use cases for Jobs are sending requests to a REST API to carry out some CRUD operation.
If you need to carry out the same Job on a regular schedule you can use a CronJob instead, these are similar to Jobs but can be configured to run on a schedule instead of only running once to completion.
But which one do I need?
This question can only be answered by you or someone who fully understands the requirements of your application. For example, if you need to persist data used by your application between Pod instances then maybe a StatefulSet is what you should be using. If you need to carry out a once of task then a Job is probably what you are looking for.
As with all software development, there are no “one size fits all” solutions so you should really try to identify what the requirements of your application are and then decide on the type of workload to go with.
Wrapping up
I hope this article has been somewhat educational to some of you. If you liked the guide and would like to see a more in-depth or broader guide please leave a comment and let me know!
If you find anything that is incorrect or misleading in the article go ahead and let me know what it is so I can learn from it! I am writing this as an educational experience for myself as well as others so I welcome constructive feedback.
If you enjoyed the article consider subscribing for updates on my future articles, also if you are not already a member on Medium you can join using my membership link.
References
[1] — https://kubernetes.io/docs/concepts/
[2] — https://kubernetes.io/docs/concepts/workloads/pods/
[3] — https://kubernetes.io/docs/concepts/workloads/controllers/


